Hanger steak is one of the beef world’s best-kept secrets—bold in flavor, rich in texture, and surprisingly easy to overcook or toughen… unless you know what you’re doing. That’s where knowing how to prepare hanger steak comes in. With the right prep, this underused cut becomes restaurant-quality beef, right from your kitchen.
Unlike ribeye or filet, hanger steak needs just a little extra love before it hits the heat. It’s got a unique grain, a central membrane, and sometimes uneven trimming straight from the butcher. If you skip the prep? You risk chewiness and wasted flavor.
In this guide, you’ll learn how to prepare hanger steak step-by-step—from cleaning and trimming to seasoning, storing, and even slicing. We’ll show you exactly what tools you need, what mistakes to avoid, and how to make every bite tender and packed with beefy richness.
If you’ve never handled this cut before or want to up your steak game, this is the only prep guide you’ll ever need.
Understanding the Hanger Steak Cut
If you want to learn how to prepare hanger steak, it helps to know what you’re working with. This isn’t your standard supermarket sirloin—it’s a specialty butcher cut with its personality, and once you understand it, it’s easy to handle.
Where It Comes From
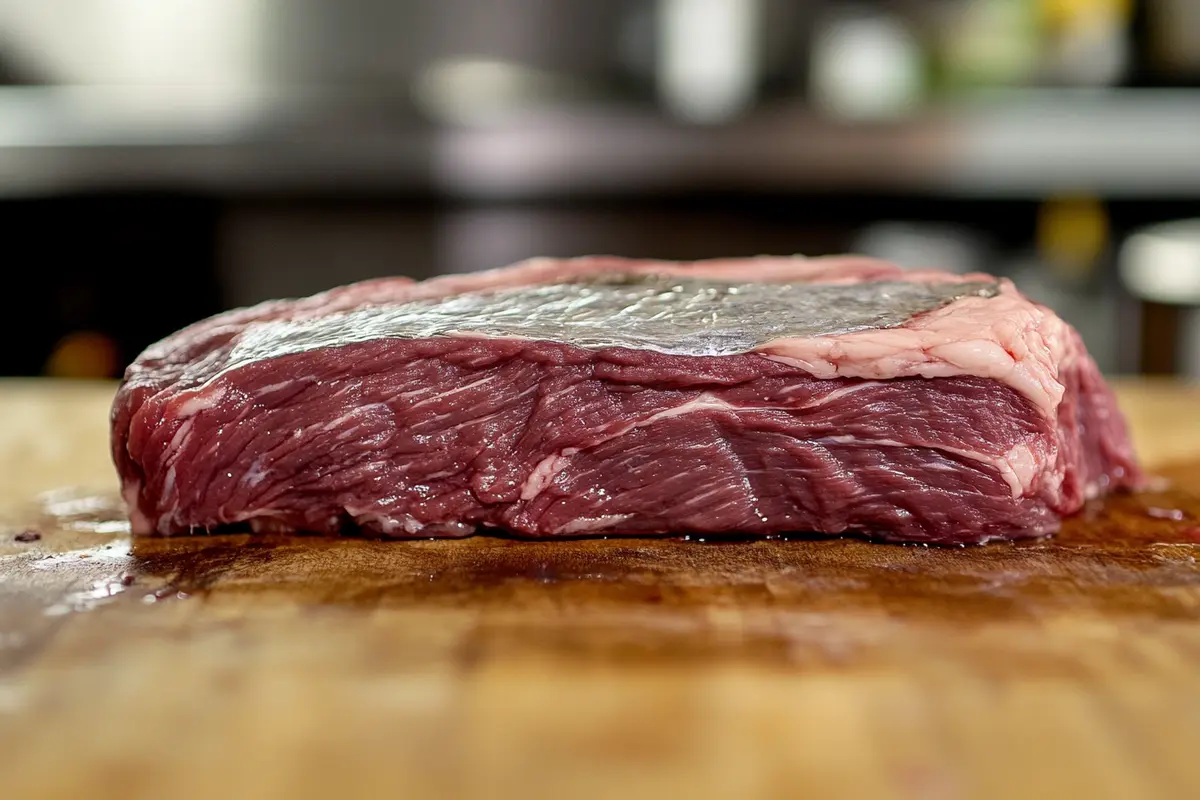
Hanger steak is cut from the plate section of the cow, near the diaphragm. It literally “hangs” inside the chest cavity, supported by the last rib. That’s where it gets its name—and also why there’s only one per animal.
Because it’s so limited, it was historically kept behind the counter for the butcher. Today, it’s known for delivering filet-like tenderness with skirt steak flavor, especially when prepared correctly.
The Grain & Internal Membrane
This cut has a loose grain, which means it absorbs marinades well and cooks evenly. But it also has a thick, inedible membrane running through the center. If your hanger steak isn’t pre-trimmed, you’ll need to remove this before cooking (we’ll show you how in Part 2).
Get that part wrong, and even the best hanger steak will end up chewy or unevenly cooked.
Hanger vs Skirt Steak
Hanger steak is often confused with skirt steak, but they’re not the same. Here’s a quick breakdown:
| Feature | Hanger Steak | Skirt Steak |
|---|---|---|
| Tenderness | More tender | Chewier |
| Texture | Looser grain | Tougher, more fibrous |
| Size | Thicker, smaller | Long, thin strip |
| Flavor | Rich and beefy | Slightly less intense |
Curious about the comparison? Check out our full guide on hanger steak vs skirt steak.
Why Proper Prep Matters
Because of its internal membrane, uneven surface, and bold grain, this cut benefits more from proper prep than many others. Knowing how to prepare hanger steak means you’ll remove unwanted chewiness, enhance flavor absorption, and nail texture before the meat even hits the pan or grill.
Cleaning & Trimming Hanger Steak the Right Way
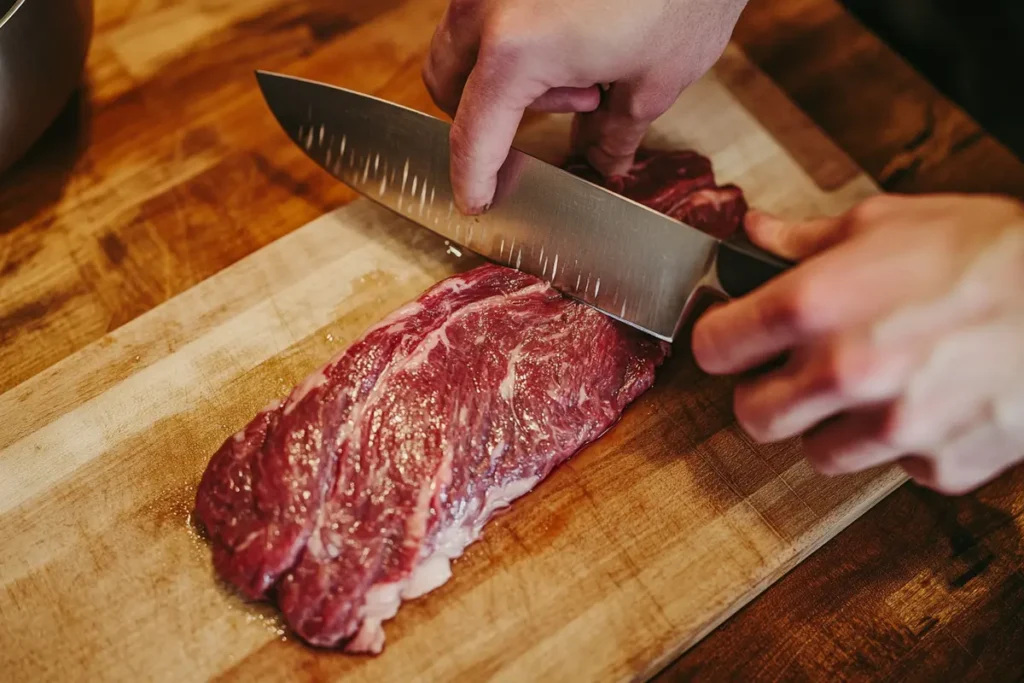
If there’s one part of prep you don’t want to skip, it’s this one. Knowing how to prepare hanger steak starts with trimming, because even the most expensive cut won’t taste great if it’s filled with chewy silver skin and that infamous central membrane.
Step 1: Gather the Right Tools
To make the job easier and safer, you’ll want a few basics:
- A boning knife or a sharp chef’s knife
- Clean cutting board (non-slip preferred)
- Paper towels for blotting and cleanup
- Optional: kitchen shears for fat trimming
Lay your steak out flat and pat it dry so nothing slips.
Step 2: Remove the Silver Skin
The silver skin is a thin, silvery-white membrane that runs along the surface of the meat. Unlike fat, it doesn’t melt during cooking and can ruin the texture.
- Slide your knife under the edge of the silver skin
- Keep the blade tilted slightly upward
- Pull the membrane taut and slice carefully beneath it
- Repeat until the top is clean
You’ll also find small fat caps along the edges—trim those if they’re more than ¼ inch thick.
Step 3: Deal with the Central Membrane
The biggest trimming challenge in how to prepare hanger steak is the tough, central membrane that separates the two long muscle lobes. It’s chewy and must be removed before cooking.
- Find the membrane (it looks like a white or grayish strip)
- Use your knife to separate the meat on both sides
- Slowly cut away the membrane while keeping the two sides intact
- Discard the membrane once freed
You’ll end up with two long pieces of steak, each ready for seasoning, marinating, or grilling.
Step 4: Final Cleanup & Shaping
After you’ve removed the silver skin and membrane, give the steak one last check:
- Trim off any stringy tissue or excess fat
- Square the edges for even cooking
- Lightly blot the steak again to remove moisture
Planning to grill it? Learn how to prep your grill and sear it perfectly.
Now that you’ve cleaned it up, your hanger steak is ready to absorb flavor and cook evenly. Whether you’re going straight to seasoning or prepping for storage, this is the step that sets the tone for everything that follows.
Learning how to prepare hanger steak the right way makes all the difference between a chewy steak and a buttery, tender one.
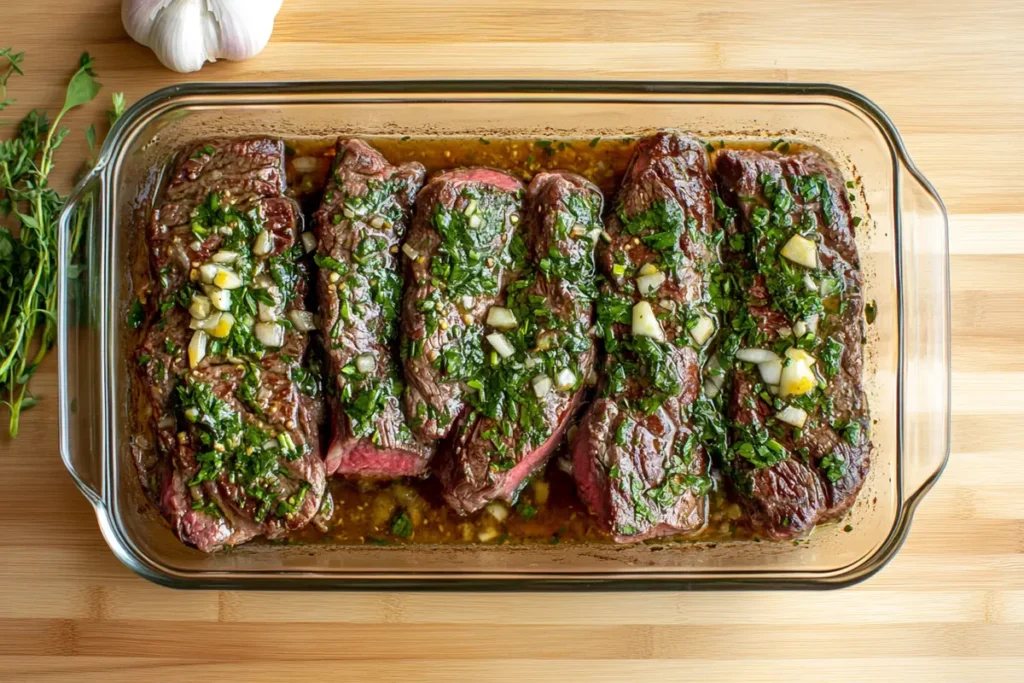
To Marinate or Not to Marinate?
Once your hanger steak is cleaned and trimmed, the next step in learning how to prepare hanger steak is deciding whether to marinate it or not. While hanger steak is naturally flavorful, the right marinade or rub can enhance texture and deepen its beefy profile, especially if you’re planning to grill or pan-sear at high heat.
When to Use a Marinade
Marinating is ideal when you want to:
- Add bold or tangy flavor
- Slightly tenderize tougher edges
- Create a caramelized crust with sugars or acids
The structure of hanger steak—loose grain, open surface, and minimal fat—makes it excellent at soaking in flavor. But because it’s already tender, the marinade doesn’t need to sit for hours.
- 30–60 minutes is usually enough for impact
- Overnight is fine, but too much acid can break down the meat and cause a mushy texture.
Go with citrus, vinegar, soy, wine, or yogurt bases if you’re after tangy notes.
When to Use a Dry Rub Instead
If you want the natural flavor to shine through or prefer a thick, crusty sear, skip the marinade and go for a rub. Dry rubs also work well for faster meals, especially if you don’t have time to marinate.
Basic dry rub ingredients for hanger steak:
- Kosher salt
- Cracked black pepper
- Smoked paprika
- Garlic powder
- Brown sugar or coffee grounds (optional)
Apply your rub at least 20 minutes before cooking—or even earlier if prepping ahead.
Combo Technique: The Best of Both Worlds
Many seasoned cooks learning how to prepare hanger steak use a hybrid method:
- Marinate lightly for 30 minutes
- Pat the steak dry
- Apply a simple dry rub just before cooking
This lets the marinade work inside while the rub builds flavor and texture outside.
Want tested recipes for flavor-packed marinades? Try these 4 proven options for hanger steak.
Do’s and Don’ts of Flavor Prep
| Do | Don’t |
|---|---|
| Use acid-based marinades sparingly | Over-marinate beyond 24 hours |
| Pat the steak dry before cooking | Leave it wet (causes steaming) |
| Salt generously in dry rubs | Skip salt and lose flavor |
| Chill during marinade, rest before cooking | Cook straight from the fridge |
Whether you choose marinade, rub, or both, this step in how to prepare hanger steak lets you control flavor, texture, and tenderness from the inside out.
Final Prep Before Cooking
So you’ve cleaned, trimmed, and flavored your steak—almost there. The last step in mastering how to prepare hanger steak is just as critical as trimming: getting it ready for heat. Small mistakes at this point (like grilling cold meat or over-salting) can ruin even the most perfectly prepped steak.
Here’s how to finish strong.
Bring It to Room Temperature
Don’t skip this step.
If you go straight from the fridge to a hot pan or grill, your steak will cook unevenly—charred outside, raw inside. The solution? Let it rest at room temperature for 30–45 minutes.
Why this matters:
- Promotes an even internal temperature
- Prevents tough, overcooked edges
- Creates a better seal when it hits the heat
If you’ve seasoned it early, leave it uncovered to air-dry slightly. This builds a crispier crust.
Pat It Dry Again
Even after marinating, blot the surface of the steak with paper towels. This removes excess moisture that would otherwise steam the meat.
Dry steak = better crust. It’s that simple.
Salt Timing and Technique
Depending on your method, you may have salted earlier. But here’s a quick refresher:
| Timing | Why It Works |
|---|---|
| 20–40 minutes before cooking | Allows salt to dissolve and flavor deeply |
| Right before the heat | Creates surface contrast, keeps moisture in |
| Too early without air-drying | Can lead to soggy, gray edges |
Don’t forget: coarse kosher salt and fresh cracked pepper are your minimums. You can add garlic powder, cayenne, or dried herbs depending on your flavor profile.
Lightly Oil the Steak, Not the Grill
Another pro move when learning how to prepare hanger steak: coat the meat with a small amount of high-smoke-point oil (like avocado or grapeseed). Don’t oil the grill—it can burn and create flare-ups.
Rub oil on both sides of the steak just before cooking for:
- Better browning
- Less sticking
- More even heat distribution
Not sure how to cook it from here? Explore the full guide on how to cook hanger steak for perfect results.
Storing, Freezing & Reusing Prepped Hanger Steak
So you’ve cleaned, trimmed, seasoned, and maybe even marinated your steak, but what if you’re not cooking it right away? Knowing how to prepare hanger steak includes knowing how to store it safely and smartly. Proper storage preserves flavor, keeps the texture intact, and saves time for future meals.
Short-Term Storage: Fridge Tips
If you’ve already prepped your hanger steak (trimmed and seasoned or marinated), it can safely rest in the refrigerator for up to 2 days before cooking.
Storage Tips:
- Wrap it tightly in plastic wrap or place it in an airtight container
- If marinated, use a glass or food-safe plastic container (avoid metal)
- Label with the date to track freshness
Pro tip: If you’re using a dry rub, let it rest uncovered on a wire rack in the fridge for a few hours — this dry-aging method deepens flavor and enhances browning.
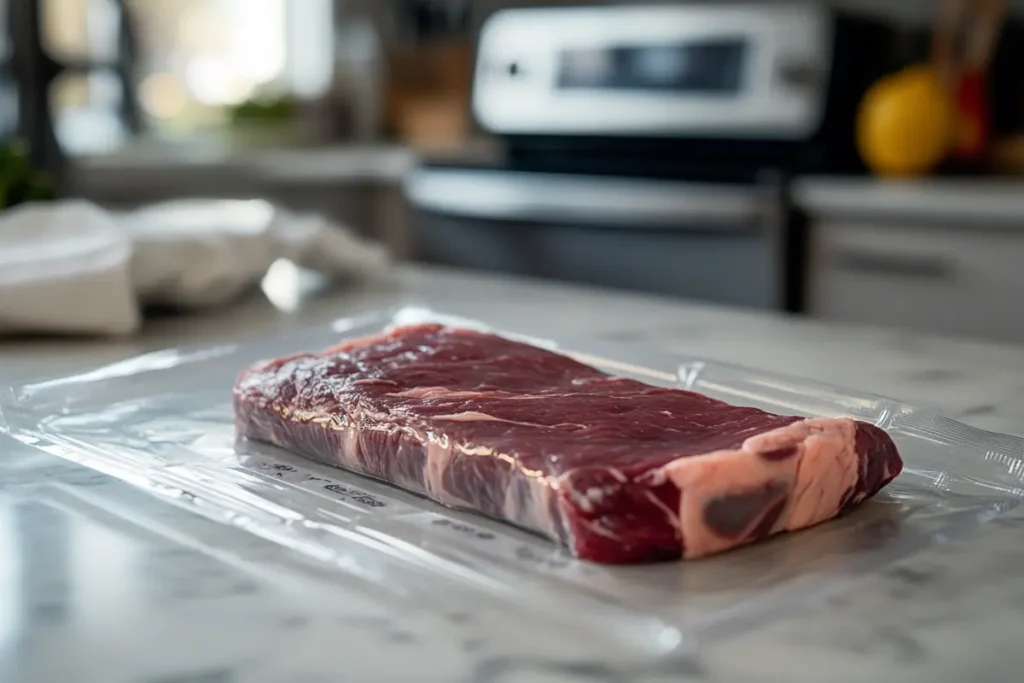
Freezing Prepped Hanger Steak
Wondering if you can freeze it? Absolutely. It’s common for people learning how to prepare hanger steak to trim and portion multiple steaks ahead of time.
Steps for Freezing:
- Trim and divide into individual portions
- Vacuum seal or wrap tightly in plastic + foil
- Label and date
- Freeze for up to 3 months
If marinated, it’s best to freeze before adding acidic ingredients like citrus or vinegar — those can break down the muscle over time and ruin the texture.
Defrosting the Right Way
Always thaw frozen steak in the refrigerator overnight. Avoid microwave defrosting, which unevenly heats the meat and affects texture.
For quicker thawing:
- Place the sealed steak in a bowl of cold water
- Change the water every 30 minutes
- Cook immediately once thawed
Reusing and Re-Seasoning Tips
If you’ve thawed hanger steak and plan to use it the next day:
- Pat it dry again
- Add a touch of fresh seasoning
- Bring to room temperature before cooking
Steak that’s been frozen and thawed can be just as flavorful, so long as you handle it with care.
Key Takeaways for Storage & Reuse
| Situation | Prep Tip |
|---|---|
| Cooking the next day | Store sealed in fridge, marinated, or rubbed |
| Freezing | Wrap tightly, label, and freeze for up to 3 months |
| Re-seasoning | Always pat dry, re-salt lightly |
| Thawing | Use a fridge or a cold water bath, never a microwave |
Whether you’re batch prepping or planning for later, knowing how to prepare hanger steak includes how to store it right, so every bite is just as juicy and flavorful, no matter when it’s cooked.