
Homemade Kudos Bars are back—and honestly, they might be better than the ones you remember from the ‘90s. Those iconic, chocolate-dipped, crunchy snack bars were a staple in lunchboxes and after-school treats. But since the original Kudos bars were discontinued, fans have been searching for ways to recreate the magic at home.
This recipe brings together crispy rice cereal, creamy nut butter, sweet mix-ins like mini M&M’s, and a decadent chocolate topping. No baking required. Just mix, press, chill, and enjoy a throwback snack that’s even more delicious—and customizable—than the original.
Looking for another nostalgic treat? Don’t miss our Air Fryer Churros for a crunchy, cinnamon-sugar dessert.
What Are Kudos Bars and Why Make Them at Home?
A Nostalgic Treat From the ’90s
If you grew up in the late ‘80s or ‘90s, Kudos bars were probably a regular snack in your pantry. Originally launched by Mars, Kudos bars were a hybrid between a granola bar and a candy bar—crispy, chewy, chocolatey, and usually topped with mini M&M’s, peanut butter drizzle, or even cookie bits. They were marketed as a granola bar, but let’s be honest: they were pure dessert in disguise.
Then they disappeared. Mars stopped producing them in the U.S., leaving fans with nothing but memories—or overpriced listings on eBay.
Why Homemade Kudos Bars Taste Even Better
Now that we can’t buy them in stores, homemade Kudos bars are the next best thing. Actually, they’re better. Why?
- Fewer preservatives and artificial ingredients
- Customizable mix-ins: add your favorite flavors and toppings
- No baking required: quick to make, easy to store
- Kid-approved and great for lunchboxes, snacks, or desserts
You control what goes in them—and how much chocolate goes on top. Whether you want to make them just like you remember or put a healthy spin on it, making your own Kudos bars at home is simple and so satisfying.
Looking for a crunchy, nutrient-packed side? Try our Crunchy Rice Salad—a savory balance to this sweet classic.
Ingredients You’ll Need for Homemade Kudos Bars
Making homemade Kudos bars is surprisingly simple—and the ingredients are probably already in your pantry. The beauty of this no-bake snack is that it combines basic components into a chewy, crunchy, chocolatey bar that delivers both nostalgia and serious snack satisfaction.
Key Components: Cereal, Binder, Chocolate
These three parts form the base of every homemade Kudos bar:
1. Crispy Rice Cereal
This provides the classic crunch. You’ll need about 3 cups for one batch.
2. Granola
This adds texture and chew. Use plain or lightly sweetened granola—about 1 cup.
3. Nut Butter + Honey (Binder)
To hold everything together, you’ll use a mix of:
- ½ cup creamy peanut butter (or almond/sunflower butter)
- ⅓ cup honey or maple syrup
- Optional: 1 tablespoon coconut oil for smoother texture
These create the sticky, chewy center that makes homemade Kudos bars so addictive.
Chocolate Coating: The Signature Finish
The top layer is what made the original Kudos bars feel like a candy bar. You’ll need:
- 1 cup chocolate chips (milk, dark, or semisweet)
- Optional toppings: mini M&M’s, chopped nuts, sprinkles
Tip: Melt chocolate chips in the microwave or a double boiler and pour directly over the pressed bars.
Optional Mix-Ins and Flavor Boosters
This is where you make your homemade Kudos bars truly your own:
- Mini chocolate chips
- Chopped peanuts or almonds
- Mini marshmallows
- Coconut flakes
- Pretzel bits
- Dried fruit (cranberries, raisins)
Add up to ½ cup of mix-ins, and sprinkle extra on top before the chocolate sets for a bakery-style finish.
Once you have your ingredients ready, you’re just a few steps away from crunchy, chewy, chocolate-drenched bliss.
How to Make Homemade Kudos Bars Step by Step
Making homemade Kudos bars is a quick and easy no-bake process that comes together in under 20 minutes—plus chilling time. You don’t need any special equipment, just a saucepan, a bowl, and a little fridge space. Let’s break it down.
Step 1: Line and Prep
Start by lining an 8×8-inch square baking dish with parchment paper, leaving some overhang for easy removal. Lightly spray with oil if needed to prevent sticking.
Step 2: Mix the Dry Ingredients
In a large mixing bowl, stir together:
- 3 cups crispy rice cereal
- 1 cup granola
- ¼ cup mini M&M’s
- ¼ cup mini chocolate chips (optional)
You can also add your custom mix-ins here—nuts, coconut, pretzels, or dried fruit.
Step 3: Make the Binder
In a small saucepan over low heat:
- Combine ½ cup creamy peanut butter and ⅓ cup honey (or maple syrup)
- Optional: Add 1 tablespoon coconut oil for smoother texture
Stir constantly until melted and fully combined. This is the “glue” that gives your Kudos bars their chewy texture.
Pro Tip: Don’t let the mixture boil—it just needs to melt and blend smoothly.
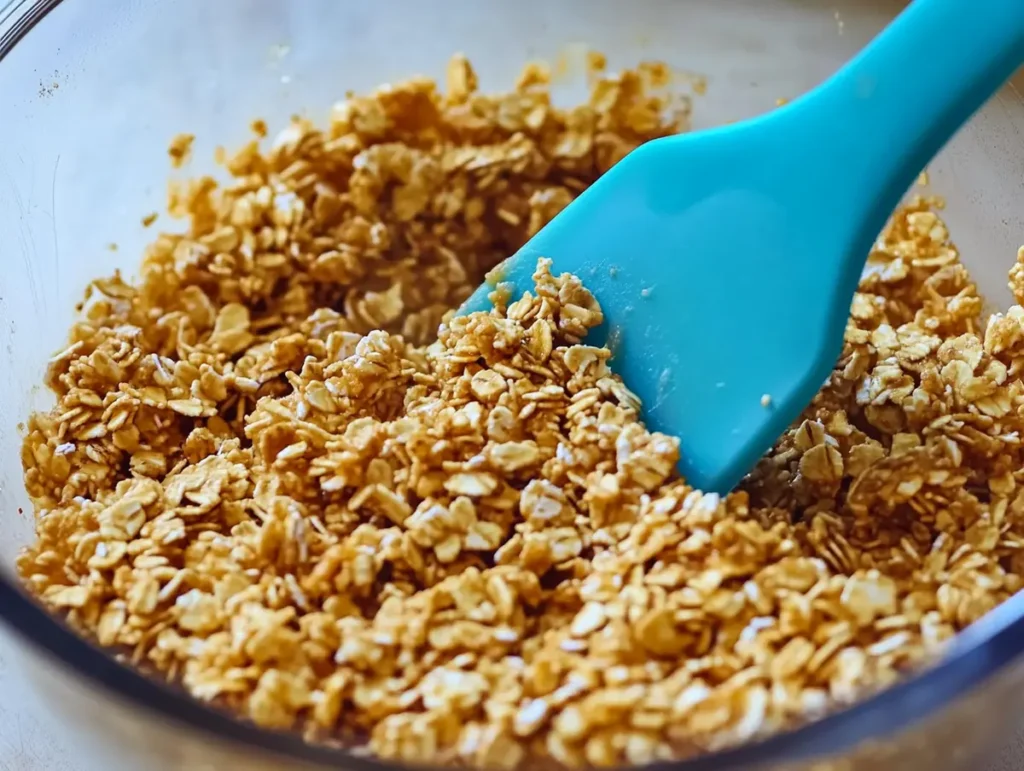
Step 4: Combine and Press
Pour the warm binder mixture over the dry ingredients. Stir thoroughly to coat everything evenly.
Transfer the mixture into your prepared pan. Use a spatula or the back of a spoon to firmly press the mixture into an even, compact layer.
The more compact, the better the bars will hold together after chilling.
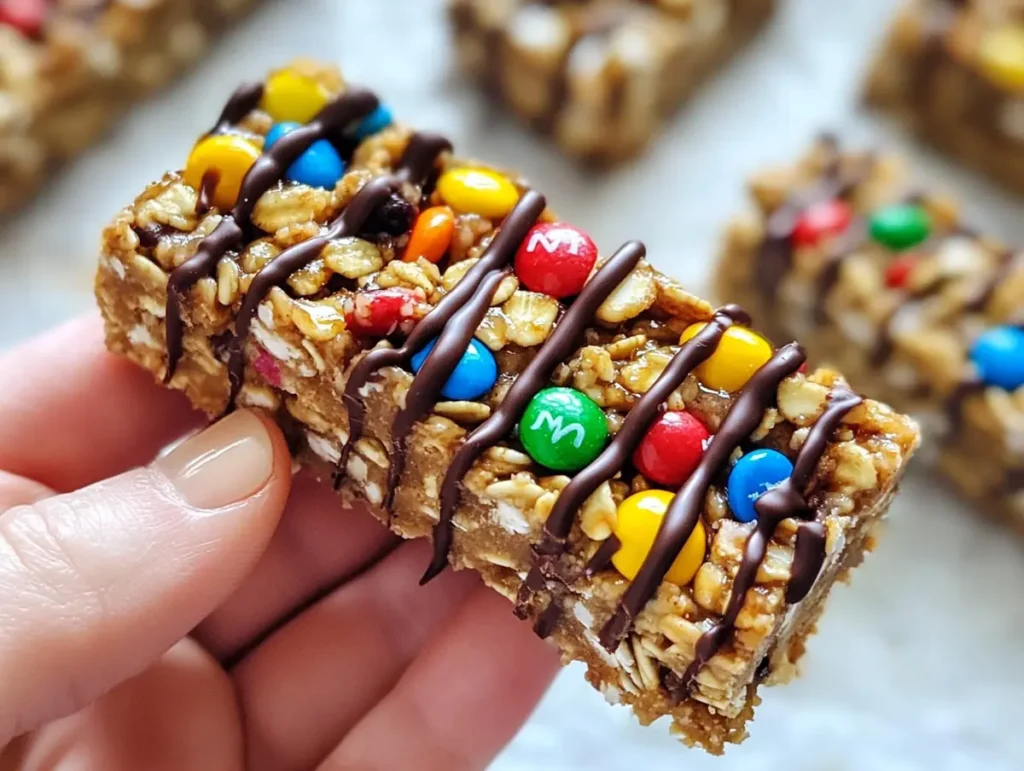
Step 5: Add the Chocolate Topping
Melt 1 cup chocolate chips in the microwave in 30-second intervals, stirring in between, until smooth.
Pour melted chocolate over the top of the pressed bars and spread evenly. Add extra toppings like:
- Mini M&M’s
- Chopped nuts
- Sprinkles
This step brings that signature Kudos bar look and taste to life.
Step 6: Chill and Slice
Refrigerate the bars for at least 1 hour, or until fully set.
Once firm, lift out using parchment, place on a cutting board, and slice into 10–12 bars.
And just like that, you’ve made your own homemade Kudos bars—sweet, chewy, and loaded with that classic crunch and chocolatey goodness.

Flavor Variations to Try
One of the best things about making your own homemade Kudos bars is how easy they are to customize. Whether you’re recreating your favorite childhood version or inventing something totally new, these flavor twists keep the recipe fun, flexible, and snack-time approved.
1. Peanut Butter Chocolate Classic
Inspired by one of the original Kudos flavors, this combo is a crowd-pleaser.
Add to the mix:
- ¼ cup chopped peanuts
- Use peanut butter as your binder
- Top with melted milk chocolate and crushed peanut bits
This is the closest copycat to the original Mars Kudos bar flavor.
2. Cookies & Cream Delight
Craving an Oreo-inspired bar? This one’s for you.
Try this:
- Use white chocolate chips for the topping
- Fold in crushed chocolate sandwich cookies into the cereal mix
- Finish with a drizzle of dark chocolate on top
3. Trail Mix Kudos Bars
Make your homemade Kudos bars snack-worthy and energizing by using trail mix elements.
Add-ins include:
- Dried cranberries or raisins
- Chopped almonds or walnuts
- Sunflower seeds
- A mix of dark chocolate chips and golden raisins
Use almond butter or cashew butter for a mild, nutty base.
4. Marshmallow Crunch
Take it to dessert level with gooey marshmallows.
Mix in:
- ½ cup mini marshmallows (fold in gently)
- Use graham cracker cereal instead of granola
- Top with milk chocolate and a sprinkle of graham crumbs
5. Kid-Friendly Rainbow Bars
Perfect for lunchboxes or birthday party treats.
How to build it:
- Use mini M&M’s, sprinkles, and colored crispy rice cereal
- Top with white chocolate and more rainbow sprinkles
- Swap peanut butter with sunbutter or wow butter for nut-free schools
With these variations, your homemade Kudos bars will never get boring. Mix and match to suit every taste or occasion—from back-to-school treats to road trip snacks or even DIY dessert bars at parties.
Print
Homemade Kudos Bars – Better Than the Original (Easy Recipe)
- Total Time: 10 minutes + chill
- Yield: 10–12 bars 1x
Description
These Homemade Kudos Bars are chewy, crunchy, and loaded with chocolatey goodness—just like the 90s favorite, but even better! Made with crispy rice cereal, peanut butter, and chocolate drizzle, this no-bake snack is quick to prepare and perfect for lunchboxes or dessert.
Ingredients
3 cups crispy rice cereal
1 ½ cups old-fashioned rolled oats
½ cup creamy peanut butter
½ cup honey or brown rice syrup
1 tsp vanilla extract
¼ tsp salt
½ cup mini M&M-style candies
¾ cup dark or semi-sweet chocolate chips (for drizzle + coating)
Optional: chopped peanuts or pretzels for topping
Instructions
In a medium saucepan, melt the peanut butter and honey over low heat. Stir until smooth, then add vanilla extract and a pinch of salt. Remove from heat.
In a large mixing bowl, combine the rice cereal and oats. Pour the warm mixture over the dry ingredients and stir well until everything is coated evenly.
Gently fold in half of the chocolate candies.
Line an 8×8-inch pan with parchment paper and press the mixture firmly and evenly into the pan.
Melt the chocolate chips in the microwave in 20-second intervals, stirring in between until smooth.
Drizzle the melted chocolate over the bars and sprinkle with the remaining candies (and optional chopped nuts).
Chill in the refrigerator for 30 minutes or until firm.
Slice into bars and serve! Store in an airtight container in the fridge for up to 1 week.
Notes
To make it nut-free, use sunflower seed butter instead of peanut butter.
For vegan bars, choose maple syrup and dairy-free chocolate chips.
These freeze beautifully—just wrap individually for grab-and-go snacks.
- Prep Time: 10 minutes
- Cook Time: 0 minutes
- Category: Snack / Dessert
- Method: No-Bake
- Cuisine: American
Nutrition
- Serving Size: 1 bar
- Calories: 210
- Sugar: 12g
- Sodium: 85mg
- Fat: 9g
- Saturated Fat: 4g
- Unsaturated Fat: 4g
- Trans Fat: 0g
- Carbohydrates: 29g
- Fiber: 2g
- Protein: 4g
- Cholesterol: 0mg
Keywords: kudos bars, no-bake bars, homemade snack bars, granola bars, M&M bars
Tips for Getting the Perfect Texture
The success of homemade Kudos bars depends heavily on texture. You want them chewy, crunchy, and sturdy enough to hold their shape without crumbling. Here’s how to master that classic bite—every single time.
Use the Right Ratio of Wet to Dry
Too much binder (peanut butter + honey) can make bars sticky and soft. Too little and they’ll fall apart.
Pro Tip:
Stick to this base ratio:
- 3 cups crispy rice cereal
- 1 cup granola
- ½ cup nut butter
- ⅓ cup honey or maple syrup
Stir well to coat all the cereal. Every grain should be sticky but not soaked.
Pack the Mixture Tightly
Lightly pressing won’t cut it. For Kudos bars that slice clean and stay intact:
- Press the mixture firmly into the pan using the back of a spoon, spatula, or even a flat-bottomed glass.
- Line your pan with parchment to make removal and slicing easier.
- Chill the base before adding the chocolate topping if you want sharper, distinct layers.
Let the Bars Chill Fully Before Slicing
Trying to cut homemade Kudos bars before they’ve firmed up is a recipe for a gooey mess.
- Refrigerate for at least 1 hour (longer is better)
- For extra clean slices, use a sharp knife and warm it slightly under hot water before cutting
Choose the Right Chocolate
The type of chocolate impacts both flavor and texture.
- Use real chocolate chips (not coating melts) for a premium finish
- Mix in ½ teaspoon of coconut oil with your chocolate before melting for a softer, smoother topping that cuts more easily
- Let the chocolate cool slightly before adding toppings like M&M’s so they don’t melt and sink
Want That “Snap”?
If you miss that slight candy bar snap from the original Kudos bars, try this:
- Melt dark chocolate and temper it (heat, cool, and reheat gently) before topping
- Chill the bars uncovered to help chocolate set firmly
- Add a pinch of sea salt on top to contrast the sweetness and elevate flavor
These small tweaks will make your homemade Kudos bars look and taste like a professional-grade snack—balanced, firm, and crave-worthy.
How to Store and Freeze Kudos Bars
Homemade Kudos bars aren’t just easy to make—they’re also incredibly convenient to store. Whether you’re making a batch for weekly snacking or prepping ahead for events, proper storage helps preserve their texture and flavor.
How to Store at Room Temperature
If your kitchen is cool and dry, you can store Kudos bars on the counter for a few days.
Best Practices:
- Place bars in an airtight container
- Use parchment paper between layers to prevent sticking
- Store at room temp for up to 3–4 days
Avoid storing near the stove or window, as heat can cause the chocolate topping to soften or melt.
Refrigeration for Longer Freshness
To extend shelf life, especially in warmer months, refrigerate your homemade Kudos bars.
Fridge Storage:
- Store in a sealed container
- Keeps bars fresh for up to 10 days
- Texture stays firm and chewy
- Let sit at room temp for a few minutes before serving for softer bite
Can You Freeze Homemade Kudos Bars?
Absolutely! These bars freeze beautifully and are great for long-term snack prep.
Freezing Instructions:
- Slice fully set bars and wrap each in parchment or wax paper
- Place wrapped bars in a freezer-safe container or zip-top bag
- Freeze for up to 2 months
To serve, simply thaw at room temperature for 20–30 minutes, or pop in the fridge overnight.
Freezing helps batch-prep for school lunches, road trips, or busy weeks—so you always have a chewy, chocolatey treat ready to go.
Are Kudos Bars Healthy? What to Know
Let’s be honest—Kudos bars were never health food. Marketed as granola bars but dipped in chocolate and packed with candy, the originals were more like dessert. But when you make homemade Kudos bars, you get full control over the ingredients—and that opens the door to healthier choices without giving up the nostalgic flavor.
Nutrition Comparison: Store-Bought vs. Homemade
Here’s how homemade Kudos bars stack up compared to the discontinued store-bought version:
| Nutrient | Original Kudos (est.) | Homemade (est.) |
|---|---|---|
| Calories | 180–200 per bar | 150–180 per bar |
| Sugar | 14–18g | 8–12g |
| Protein | 1–2g | 2–4g |
| Preservatives | Yes | No |
| Artificial Flavors | Often | Optional/Natural |
By making them at home, you can skip the artificial stuff, lower the sugar, and even boost the nutrition with better ingredients.
Healthier Ingredient Swaps
If you’re looking to clean up your bars, try these tweaks:
- Nut butter: Use natural peanut or almond butter with no added sugar
- Sweetener: Swap honey for maple syrup or brown rice syrup
- Chocolate: Use dark chocolate (70%+) for less sugar and more antioxidants
- Cereal: Choose whole grain crispy rice or organic rice cereal
- Mix-ins: Add flaxseed, chia, or protein powder to increase nutrients
- Nuts & seeds: Boost protein and healthy fats with almonds, walnuts, or pumpkin seeds
Gluten-Free & Nut-Free Options
Making Kudos bars allergen-friendly is simple:
- Gluten-free: Use certified GF crispy rice cereal and granola
- Nut-free: Swap peanut butter for sunflower seed butter or oat butter
- Dairy-free: Use vegan chocolate chips and maple syrup instead of honey
With these easy substitutions, you can tailor homemade Kudos bars to suit any diet or school-safe requirement—while still keeping that chocolatey, crunchy charm.
The History of Kudos Bars and Why They Disappeared
Before we all started making homemade Kudos bars, there was the original: shiny-wrapped, crunchy, candy-coated bars that sat somewhere between a granola bar and a chocolate bar. Let’s take a quick trip down snack memory lane to understand why these beloved bars vanished from store shelves—and how homemade versions are keeping the memory alive.
The Rise of Kudos Bars
Kudos bars were introduced by Mars, Incorporated in the late 1980s. Their mission? To make granola bars that tasted more like a treat than a health food. Wrapped in foil and filled with crispy rice, chocolate, and often topped with candy like M&M’s or drizzled with peanut butter, they quickly became a lunchbox favorite for kids—and a sweet snack for adults.
They were available in multiple flavors:
- M&M’s
- Snickers
- Dove Chocolate
- Peanut Butter Chocolate
- Cookies & Cream
They felt fun, indulgent, and convenient—just what the 90s snack market craved.
The Discontinuation of Kudos
By the 2010s, Kudos bars began disappearing from store shelves. While Mars never issued a major public statement, there are a few likely reasons why:
- Changing health trends: As consumers started seeking healthier, cleaner snacks, Kudos bars—loaded with sugar and marketed as granola—felt outdated.
- Brand confusion: Were they candy bars? Granola bars? Healthy? Dessert? That unclear identity may have hurt their longevity.
- Retail competition: Newer snack bars like KIND, RXBar, and CLIF filled the shelf space once dominated by Kudos.
Eventually, production ceased and the once-popular snack became a nostalgic memory for many.
Why Homemade Kudos Bars Bring Them Back (Better)
Fortunately, the internet loves nostalgia—and food bloggers and home bakers began recreating the bars we all missed. Today, homemade Kudos bars offer a better version of the original:
- No preservatives
- Customizable ingredients
- Diet-friendly alternatives
- Better flavor and texture
And best of all? You can make a whole tray for less than the cost of one modern snack bar.
Serving Ideas and When to Enjoy Homemade Kudos Bars
Homemade Kudos bars aren’t just a nostalgic snack—they’re a versatile, make-ahead treat that fits into just about any moment of your day. Whether you’re packing lunches or building a snack platter, these bars bring both fun and function to your food.
Perfect for Lunchboxes and Snack Packs
These bars are kid-approved and mess-free, making them ideal for school lunches or after-school snacks. They’re easy to wrap, easy to portion, and don’t require refrigeration—especially helpful for busy parents and on-the-go professionals.
Pack with:
- Apple slices or grapes
- A cheese stick or trail mix
- A small bottle of water or juice
They’ll satisfy the sweet tooth without relying on store-bought snacks full of additives.
Sweet Addition to Party Platters or Dessert Tables
Serve Kudos bars at parties by slicing them into bite-sized squares or finger-friendly sticks. They pair perfectly with coffee, hot chocolate, or as part of a DIY snack bar setup.
Occasions to serve them:
- Birthday parties
- School events
- Holiday dessert boards
- Office potlucks
Make a rainbow batch with different toppings—like crushed pretzels, sprinkles, and coconut—to add variety and visual appeal.
Fuel for Outdoor Adventures
These bars are sturdy and travel well, making them a great option for:
- Road trips
- Hiking and camping
- Post-workout energy
- Beach days or picnics
Just wrap individually in parchment or wax paper, toss in a cooler or tote, and snack without fuss.
Pairing Ideas for Balanced Snacks
Balance out the sweetness of homemade Kudos bars with nutrient-dense sides.
Great pairings:
- Greek yogurt and berries
- A small smoothie or protein shake
- Crunchy Rice Salad for a sweet-and-savory lunchbox combo
Whether you’re reliving your childhood or introducing a new generation to the magic of Kudos, homemade versions are flexible, affordable, and endlessly fun to share.
Frequently Asked Questions (FAQs)
Do they make Kudos bars anymore?
No. Mars discontinued Kudos bars several years ago, and they are no longer available in stores. However, homemade versions have become popular online.
Why did Kudos get discontinued?
While no official statement was released, changing health trends, brand confusion, and retail competition likely contributed to the product being phased out.
Do Kudos still exist?
Not in stores, but homemade Kudos bars are everywhere. You can recreate the classic snack using simple ingredients like crispy rice cereal, nut butter, and chocolate.
Are Kudos bars healthy?
Store-bought Kudos bars were more of a dessert than a health snack. Homemade Kudos bars can be made healthier with better ingredients, less sugar, and more whole-food add-ins.
Can I make gluten-free or nut-free Kudos bars?
Yes! Use gluten-free cereal and granola, and swap peanut butter for sunbutter or oat-based butter to make them allergen-friendly.
How long do homemade Kudos bars last?
They last 3–4 days at room temp, 7–10 days in the fridge, and up to 2 months in the freezer.
Conclusion: A Crunchy, Chocolatey Comeback You Can Make at Home
Homemade Kudos bars are the ultimate throwback—crunchy, chewy, and dipped in chocolate. Whether you’re recreating a childhood favorite or discovering this nostalgic snack for the first time, the homemade version lets you skip the preservatives and enjoy something fresh, fun, and totally customizable.
Make a batch in under 30 minutes, store for later, and bring them to school, work, road trips, or parties. With endless mix-in possibilities, there’s no wrong way to relive the magic of this sweet snack bar.